Your Source For Making Wine and Beer

Cheese and Wine

Monday, October 31, 2005

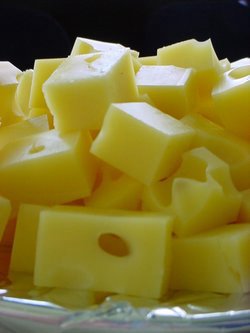
A couple of years ago, I got thinking what would go great with my homemade wine. Then it dawned on me, cheese. Not wanting to just run to the store and by it, I set out to see if I could make my own cheese.

The first couple of attempts were not what I expected. One batch the curd really had not set right and it was more like yogurt. Threw that batch out. Tried a 30 minute mozzarella and it was just ok. An owner from an Italian restaurant, who was originally from Italy, gave me some tips on how it was done back home. Basically, old school, and his tips did make for a better mozzarella.

I tried making a hard cheese with cumin and caraway seed added. I didn't have a press at the time, so I ended up using two cake pans. A 6" pan inside of an 8" pan and used clamps for pressure. Honestly, it did turn out to be a very good cheese. Surprised the crap out of me.

The worst on of all was the batch made with raw milk. I tried to follow the old school recipe to make mozzarella and tried to age it in the whey for 4 weeks. After a week, the stench in the house was just too much. I pulled the cheese out and boy did it stink. We then named it "Stink Cheese". Well, I powdered the outside of the "Stink Cheese" with garlic powder and the smell went away. Lucky for me. I aged it for about 8 months and took it to the local wine club meeting. Every one loved "stink cheese." Go figure, starts out a bust and ends up good.

If you are interested in trying to make your own cheese here are a couple of sites that I recommend:

http://biology.clc.uc.edu/Fankhauser/Cheese/Cheese.html This guy has been making cheese for over 30 years and his site has easy step by step instructions.

http://www.cheesemaking.com/ Website of Ricki Carroll who has a book called "Home Cheese Making" Great book. I've read it about 5 times because it contains a lot of basic info.

http://www.ext.colostate.edu/pubs/foodnut/09337.html This site has a few simple soft cheese recipes. The easiest ones to make and requires no special equipment.

http://www.countrysidemag.com/issues/3_1999.htm Interesting article on cheese making.

Good luck and let me know how your cheese turns out.

Read more...

Extra Grape Juice

Saturday, October 29, 2005


The boss just gave me a bunch of concord grape juice made from the grapes on their farm. They wanted to know if I can use it and make something with it. Duh, wine of course.
This year's batch was pretty sweet compared to previous years. The Brix was around 15, so a little sugar was need to bring it up to around 22.
Color is a deep purple and I really can't wait to add the yeast to it. Will have to wait until tomorrow since I added campden tablets today.
Really looks like it will be a decent wine. I'll let you know how it turns out.

Read more...

Open Fermenting Beer or Wine

Thursday, October 27, 2005

Ok, this is gonna' be me ranting about why none of the beer books, web sites, or experts talk about open fermenting their beer. Basically, open fermentation was the way it was done in the beginning and is still being used in the Trappist Monasteries. So why the big mystery? Why, close the lid on your primary fermentor? Aren't we suppose to be getting oxygen to the yeast so that it can chew up the wort and make our beer or wine?

And you know what really bugs me, is that you can't find any sources for techniques on open fermenting.

I've been using open fermentation for the past three years with a lot of success. I usually achieve a high floccuation ratio (75 - 80%) on beer and almost 100% on wine using this method. The trick that I use is to take a large grain bag and tie it over the primary fermentor. Once the primary fermentation process is almost complete (beer usually 1 - 3 days, wine about a week) rack it over to a secondary fermentor and then close the lid. Try it with your next batch, the results are amazing.

Now, if I could only find hop utilization information when dry hopping.

Till next time, Slainte

Read more...

Gluten Free Beer

Wednesday, October 26, 2005


A couple of months ago, a customer came into where I work and asked if we sold any gluten free beer. I told him that we did not, but I would look to see who did. I searched on the net and at the time found a couple of companies that made it. But as luck would have it, it is not distributed in my state. I told him that I would try to make some and let him know how it worked out. I haven't made any yet because I wanted to see if there were anymore recipes than the one that I was making up.

I found 4 good sites on the making gluten free beer. The first 2 sites are:

www.bellaonline.com/articles/art33929.asp

www.bellaonline.com/articles/art35224.asp

The recipe on the first site is fairly simple and should make a decent beer. The second article gives a little more background on gluten free beer as well as a couple of compaies that make it.


The next 2 sites require a little more work than just opening a can and boiling some water. The sites are:

www.mrgoodbeer.com/gf

www.fortunecity.com/boozers/brewerytap/555/gfbeer.htm

These are for the adventuresome person and they also look rather interesting. The list of additives looks like fun and I really can't wait to try the process.

I should be making a batch within the next few weeks, so I'll let you know how it turned out.

Read more...

Easy Beer Recipe

Monday, October 24, 2005

Freezing my butt of here because the temperature has dipped down in the 30's. I hate cold weather, with one exception. It's a good time to make beer. So, I thought I would dust off one of my very first recipes and post it for you to enjoy. It is called Double Ale and it gets its name from the fact that the grain to water ratio is 2:1. This will generally make a beer in the 4.5 to 5% alchohol range.


Double Ale

Ingredients:

3 1/2 lbs Amber Malt Extract
8 oz Crystal Malt Grain
4 oz Pale Malt Grain
4 oz Oat Grain (I used Old Fashioned Oats)
1 oz Cascade Hops
1 oz Fuggle Hops
1/2 Teaspoon Irish Moss
1 packet Muntons Ale Yeast
3/8 cup Corn Sugar (priming)


Date Brewed: March 21, 2001

Original Gravity: 1.049

Procedures:

1. Steep Grains for 1/2 hour
2. Strain grains and add to brew pot along with 1 gallon water
3. Add Malt Extract and allow to boil
4. When wort begins to boil, add 1/2 of the Hops and boil for 1 hour
5. After 1 hour, remove hops and add the other 1/2 of hops, boil for 1/2 hour
6. Last 15 minutes of boil, add Irish Moss
7. After chilling, pour into primary fermenter and add water to the 3 gallon mark
8. Pitch yeast

Will make about 2.5 gallons bottled or about a case of 12 oz bottles. Also, I like to pitch the yeast around "blood temperature" or 98 degrees. Last couple of years, I have been doing an open fermentation for the first 12 hours. I use a large grain bag tied over the top. I also do a dry hopping by adding additional hops at this stage.

Read more...

Welch's Grape Juice Wine

Saturday, October 22, 2005


I've had people ask me what is the best way for a novice to make wine. I tell them to go to the store and buy Welch's 100% Frozen Grape Juice. Man the looks that I get. "Really," they ask, "you can make wine from grape juice from the store?" I tell them it is no different than going an buying a 5 gallon bucket of grape juice from a winery or wine supply store. The key is to get the 100% Juice without any preservative.

I have found that two 11.5 oz cans to 1 gallon along with some additional sugar, makes a nice medium bodied wine. I have used the white grape juices and most of their varieties with very excellent results. I have also used Juicy Juice, but beware, it is mostly apple juice instead of the real thing.

Here is one of my recipes that uses Welch's store bought juice.


Grape Raspberry

Made December 22, 2002

Makes 1 Gallon

Silver Medal Winner 2003 Keystone Country Festival

2 11.5 ounces Welch’s Grape Raspberry Juice (frozen)
3 Cups Sugar
2 Teaspoons Acid Blend
1 Teaspoon Yeast Nutrient
1 Campden Tablet
1 Gallon Water
1/8 Teaspoon Grape Tannin
½ Pack Cotes De Blanc & Narbonne Dry Yeast


Original Gravity 1.100

Racked January 12, 2003, Gravity was 1.020, 4 ounces of sugar, 1 campden tablet and potassium sorbate added.

Racked February 1, 2003, Topped off with water

Racked March 2003 added Hungarian Oak Chips
Bottle May 2003


Read more...

Brew Review

Thursday, October 20, 2005

Brew Review


I have been out of town for the past 2 days and really wasn't able to write about anything. This evening, while sucking down a 32 oz Dos Equis Amber at the local Mexican restaurant, I decided I would write about the beers that I would spend my money on. Of course, everyone's taste buds are different, so this is no way the definitive list of beers to buy.

Lets start with Light Beers. First of all, I am not a light beer drinker. I still think that light beer is the brewery's way to make you pay full price for a product that has less ingredients to start with. But, if I had to buy a light beer, my choices would be: Amstel Light, Miller Lite, Yuengling Premium Light, and suprisingly Iron City Light. These beers have a fuller taste and taste more like beer than any others that I have tried.

In the Yellow Beer category, there are only 3 that are not bad. Coors Extra Gold, Genesse Cream Ale and Yeungling Premium. Once again, they taste like beer.

The Amber Beer category has Michael Shea's Irish Amber and Yuengling Traditional Lager. Of course, there are thousands of brewpubs making their versions of an Amber beer, and of the ones that I have tried, all have been excellent. Just way to many to list or maybe I drank so many that I can't remember the names. I think it might be the second reason.

Dark Beer category would be basically Guinness and Yuengling Porter. I'm a sucker for a beer that has a lot of taste behind it and besides Guinness has only 125 calories to a 12 oz serving. Almost a light beer.

The Microbrew Category is a real tough one. Just so many that are excellent. Sierra Nevada, Victory, Brooklyn, are just a few in my neck of the woods that are worth the money.

For Imports, I would have to say anything imported except Corona. It seems that every bottle of Corona that I have tried smells skunky and tastes watery. No wonder you have to put a lime in it. I had a really good Indian beer and and average Brazilian beer about 2 weeks ago. Still better than Cornona.

Lastly, the Cheap Beers. Had some real fun this summer going on the cheap beer routine. You know, the ones you drank when you were younger? Pabst wasn't too bad and the $2 drafts at the local ballpark were great during the heat of the summer. Locally, the $1 Miller High Lifes hit the spot after playing a softball double header and it is ok on draft. Had too many of these in bottles during my younger days that tasted awful, so I still can't bring myself to buy it in bottles. Milwaukee's Best or The Beast (Regular) is not that bad for a really cheap beer. At least it is drinkable compare to Old German (an Iron City product). It took 18 of those over a week before I could handle the last 6.

I know, I probably missed your favorite and got you all ticked off at me. Well that's ok because this is what I would spend my money. If you want to send me your list, that would be great, just e-mail me. Maybe if I get enough responses I could publish a Top Twenty List. And, if you want to send me a case of your favorite beer, that would be even better.

So till next time, Slainte.

Read more...

Simple Beer Techniques

Tuesday, October 18, 2005

Simple Beer Techniques


Went downstairs to the basement today and re-discovered an "ancient artifact" of my early beer brewing days. The rootbeer barreled, spigoted, Mr. Beer brewing vessel. Geesh, I haven't used that thing for about 4 years, and that was to make rootbeer soda, but it did bring back the memories of those first attempts at homebrewing.

I received this piece of equipment as a 2000 Christmas present. Something that I had wanted for several years but never got around to buy one. I did try making beer in the early 80's but that was one major disaster. Much easier at the time to just go buy a case of beer (around 5 bucks) then it was to make.

Well, anyways, I opened that present and began to read the instructions. Boy, was this going to be easy. Add some water, the canned ingredients, some yeast and voila, beer. That first batch turned out to be drinkable, but was no where near the level of a good beer.

So, I scrounged around bookstores and library to find so books about homebrewing. The best one that I found was "Hombrewing For Dummies." Real simple book and easy to read. Got all kinds of tips on improving my beer along with the tons of basic information.

So, I went back to using Mr. Beer for about 6 months, but with better results. The beauty of using Mr. Beer is that you make small batches, so you get a lot of practice. I usually advise anyone that is starting out to go this route but I also tell them to buy cans of liquid malt extract along with hops and some specialty grains.

A good website for anyone just getting their feet wet is: http://www.howtobrew.com. Check it out, it is really informative.

Till next time, Slainte.

Read more...

Monday, October 17, 2005

Musgo Wine - My First Attempt


Ah, musgo wine, my very first attempt at making wine. Beer brewing season was winding down in late spring 2002 when I first got the inspiration to make wine. Before that time, I really had no interest in wine. Never liked the taste. So, rushing down to the library, I took out some books and began to read. Way too much infor for someone just starting out.


Next trip was to the local winery which sells wine making supplies. John, the manager, was quite helpful and sold me the very basic stuff that I needed along with giving me some tips. Next thing I needed to do was to find either some fruit or juice that I could use.


Heading home I got thinking, "Hey I have some stuff in the freezer, maybe I can use that." At that time, Musgo wine was born. Searching thru the freezer, I found orange juice, lemonade mix and strawberries and thought, "this stuff is getting old, it must go. So I'll use it for the wine."


I mixed up the juices and the strawberries, threw in some dried currants along with sugar to bring my hydrometer reading to 1.085. Added the yeast and the other chemicals and waited. It took several days before it started to work, simply because no one every told me that the campden tablets would slow down the process.


Well after a week of fermenting, the wine was racked over allowed to age for several months. Before bottling, I added a little more sugar along with potassium sorbate to stop any further fermentation.


It got me thinking, "Could I use store bought juices? Hmm...I'll have to try on the next batch."


I finally opened a bottle in the fall of 2002 and was quite surprised at the taste. Honestly, I was expecting something rather puckery and awful. It wasn't bad and the best thing is that it only cost about a buck to make each bottle.

Read more...

Sunday, October 16, 2005

Beer: The Basics - Speciality Grains

Of course all malt begins with grains, so let’s talk a little about them. There are 2 basic ways to use grain in your beer making process. First, you can use all grain to brew. This process will take you about 6-8 hours and involves quite a few more steps then brewing with liquid or dry malt. We are going to limit ourselves to taking about the second way of using grains and that is as a specialty grain.

Specialty grains add flavor and color to your extract beer. These grains are usually crushed and then steeped. You can use a grain crusher if you have one, or put the grains in a baggy and crush them with a rolling pin. The main idea is to break the husk so that the water can get to the inside of the kernel. There are quite a few different specialty grains, but let’s just talk the most common.

The basic grain that is used as a base for beers is called Pale Malt. Usually the color of this grain is almost white and when used gives beer its yellow color. When making beer from extracts, this grain is rarely used as a speciality grain.
Going up the color scale, you will find what is called Crystal or Caramel Malt. These grains will add an amber color to a light extract along with caramel flavor. It will give your beer more body, stability and head retention. 20L, 40 L and 60L are the more common listings for this grain. The 20L refers to the color spectrum on the Lovibond scale. The higher the number the darker the color and the more sweet the caramel flavoring. I generally use a 40L Caramel Malt but I have also used 120L for brewing a sweeter tasting beer.

Chocolate Malt has a Lovibond rating of around 300—350 and will look dark brown in color. Primarily used in Brown Ales, Porters , Dark Lagers and Stouts this will give your beer a dry, chocolatey flavor .

Black Patent Malt color is 500 deg L +/- 25. Flavor can be slight to smokey. Black malt can be used in both ales and lagers to add a touch of color in light beers or to add a dark rich color in porters and stouts. Black malt can impart color and, when used in large quantities, an almost acrid flavor characteristic of stouts and porters. To slightly increase color in light beers; try adding 1/2-1 oz per 5 gallon batch. In darker beers, try 5 oz's per 5 gallons of beer. For porters and stouts; 1-10% of the total grist may be black malt.

Dextrine or Carapils malt's color is 1.5. Adds body (mouth feel); head retention, foam stability without effecting the color of the finished beer. Can be used with or without other specialty grains. Use 5-20% of grist for light colored beers and 2-10% in dark beers to obtain the above desired effects.
So using speciality grains to your extract beers will give you more control over how you brew your beer and to what color and taste that you want to achieve.

Read more...

Saturday, October 15, 2005


Beer: The Basics - Malt

That wonderful beverage called beer, starts with just four basic ingredients. Malt, water, yeast and hops. Let’s first talk about malt. Malt comes from barley kernels that are partially germinated and then roasted. The longer the roasting, the darker the color. The best malt is made from 2 row barley.

Malt can be purchased by either liquid or dry. Liquid malt (malt extract) or malt syrup as it is sometimes called comes in a variety of containers. The most common is the 3 1/2 pound cans, but 3 1/2 pound plastic bags and 5 gallon containers can also be purchased. When I first started brewing I used the 3 1/2 pound cans because they where easy to store and easy to use. I recommend that you use the cans for your first several batches.

Liquid malt basically comes in 3 different styles. Light is used for making beer that is yellow in color, Amber is used for making tan colored beers and Dark is used for making black colored beers. You also have the choice of getting your malt hopped or unhopped. Personally, I use the unhopped variety, but if you want to speed the brewing process up, then use the hopped variety.

Dry malt extract or DME as it is called is basically malt extract that has the liquid evaporated out of it. Three pounds of dry malt is about the same as 4 pounds of liquid extract. I prefer the dry malt over the canned because it is easier to measure when you are trying to duplicate another recipe.

Dry malt also comes in the basic 3 colors, so if you get a light variety, then you should be able to brew a yellow colored beer.


Read more...

Welcome to Homemade

Welcome to Homemade Wine and Beer.


A little background. I have  been making beer for almost 6 years and wine for about four years.  When I was starting out, I always found it that it was a pain trying to find useful and basic information on both hobbies.  Of course, over the past 6 years, internet resources have gotten better and things are a little less frustrating to the beginner.  The purpose of this blog is to provide some basic information and to explore new techniques in both homebrewing and wine making.

Read more...

  © Blogger templates Newspaper II by Ourblogtemplates.com 2008

Back to TOP