Your Source For Making Wine and Beer

Pouring a Black and Tan

Thursday, February 28, 2008

It's almost St.Patrick's day and everyone likes to act like they are Irish. And what's more Irish, than Guinness. Use a bottle of your homebrew and a can of Guinness to make your own Black and Tan's. This article tells you how to make a Black and Tan along with some other background. Experiment and have fun.


Read more...

Making Your Own Wine

Tuesday, February 26, 2008


So, you want to make your first wine? How do you get started and what equipment do you need? Hopefully I'll be able to guide you through the process.

The first step is to decide what kind of wine you plan on making. Do you plan on making it from fresh fruit? Or, do you plan on using juice? Let's start with using frozen juice.


One of the simple ways to make wine is to use frozen juice concentrate. I have used Welch's frozen concentrate for numerous wines. For a recipe, click here. You must use the frozen since it does not contain potassium sorbate. The potassium sorbate will prevent your wine from fermenting. So make sure you buy the frozen kind of juice.


You can also buy juice in 5 gallon containers and these are usually specific kinds of juice. ie Merlot, Syrah, etc
.

Another kind of juice that you can buy is Vintner's Harvest. Usually this comes in 46 ounce or 92 ounce cans and is usually fruit. Ie. Peach, Cranberry, Raspberry, etc. The side of the can provides generic instructions on making your wine.

Ok, back to the frozen juice. Next you have to decide if you want a light bodied, medium bodied or full bodied wine. The recipe is pretty easy to remember. 1 can per gallon for a light bodied wine, 2 cans for a medium bodied wine, and 3 cans for full bodied wine.

Next pour your juice into your fermenter. I use an Ale Pail. Fill it to about the 3 gallon mark with juice and water. This fermenter has a lid and airlock, which I do not use for the primary fermentation. You can if you want, but I kinda' like to watch my wine ferment.

If you plan on using fresh fruit, then you must crush the fruit first. For a batch that is less than 5 gallons, I use a potato masher.Crush your fruit and add it to your fermenter.

At this point we need to test for sugar and acidity.

At this stage, it is easy to adjust your acid content as well as your sugar content. Trying to test after the fact is a major pain in the butt, so you want to do this part every time you make wine.

Let's start with checking for acid. You can use Ph paper but a more accurate way is to use an acid testing kit.
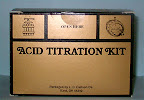
Acid testing kit


You can usually purchase a kit for around $7. Depending on the type of wine you are making, the acid percentage should be around .60% to .85%. The kit tells you what your percentage by generally fruit (peach, strawberry, etc.) and red wines should be lower in acid and the whites should be higher. The kit includes a bottle of sodium hydroxide, coloring agent, testing tube and a syringe
.

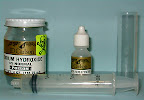
Parts of the acid testing kit

The process to test is rather simple. First you take the testing tube and fill it 15 cc of your must.

Testing tube with 15 cc of must

The second step is to put 3 drops of the coloring agent into the testing tube. Third step involves filling the syringe with 10 cc of sodium hydroxide. Caution -- Sodium hydroxide is very poisonous, be extremely careful around pets and children. The last step is to slowly put 1 cc of sodium hydroxide at a time into the testing tube until it changes color. At that point, you will know the percentage acid in your must. Basically, if you put in 5 cc of sodium hydroxide, then your must has .50% of acid content.

Testing tube after it has changed colors

After you determine the percentage of acid in your must, then you can make the necessary adjustments. If you need to raise your acid content, add acid blend according to the directions on the kit. If your acid content is too high, then add water and retest. I usually shot for anything between .60 and .70 for most of my wines and I usually don't sweat it if it comes to .70 when it should be .65. What you really don't want it a wine that is too low in acid or too high in acid because it will make some very nasty wine. And, I mean nasty in a bad way, not a good way. Now that the acid testing is complete, we can move to testing for the amount of sugar.

To measure sugar content we use an instrument called a hydrometer. A hydrometer looks like a thermometer but with a bubble at the end. For more info on how to read a hydrometer, click here. Basically water will read 1.000 on a hydrometer and most wines will ferment a few steps below that level. For most wines, you want the hydrometer reading to be 1.085 - 1.095. Most hydrometers will have 3 scales on them. Personally, I like the 1.000 system instead of Plato or Brix.

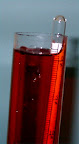
Hydrometer in testing tube.

Notice that the hydrometer is barely over the top of the tube. This liquid was 1.000

Pour some of your must in the testing tube and then put the hydrometer in. Check the scale, if not enough sugar, add white table sugar a cup at a time. If you have too much sugar (over 1.100), then add some water

. Added some sugar.

Notice that the hydrometer sticks up higher in the testing tube. This measured about 1.020
.

In the first post, I mentioned when using juice concentrate to fill your fermenter to the 3 gallon line before adding sugar. What I usually do at this point is to warm up 1 gallon of water and stir in 1 1/2 bags (5 lb) of table sugar. Once that is dissolved, pour it in the fermenter and stir for about 30 seconds. Then test your must for its sugar content. Too high, add some water, too low add some sugar.

We are now ready to add all the other things that go into your wine so that it can ferment properly.

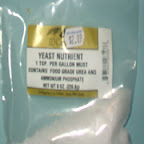
One thing that almost all wine needs to get it going is yeast nutrient. This acts as a jump starter to get the yeast cells motivated to turn the sugar into alcohol. You don't need to use a lot of this so follow the directions on the label for dosage .


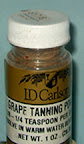
For wines other than grape wines, you usually have to add a little grape tannin to your must. I generally only use 1/8 of a teaspoon per gallon. If you are in a pinch you can use raisins instead of grape tannin. A handful of raisins per gallon should be enough.


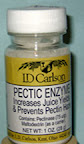
Certain types of fruit will require you to add pectin enzyme to your must. This breaks down any pectin that is in your wine. Pectin in your wine makes it very difficult to fine and clarify. So, for things like peach wine, strawberry wine, apple, wine, etc, use the pectin enzyme.
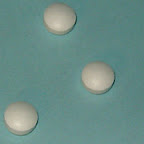
Campden Tablets

Campden tablets or sulphur dioxide is the last thing that you add to your must before adding the yeast. This will help to sterilize the must and kill any wild yeast cells that are hanging around. Generally, most people will tell you to add 2 tablets per gallon of must. Personally, I use about 1.5 tablets to a gallon before the fermentation, 1 tablet per gallon on the second racking and for the last racking prior to bottling.

After these items have been added to your must, leave the must alone for at least 24 hours. Do not add yeast until the after 24 hours because the capmden tablets will kill it if added now.

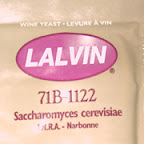
Last item to add is the yeast. There are quite a few different yeasts out there, but they fall into 2 categories, dry or liquid. With the liquid variety, you are able to make more style specific wines. Personally, I use the dry wine yeast because it is a lot cheaper and because most of my wines are fruit wines. The 2 major dry yeast companies are Red Star and Lavlin. I prefer the Lavlin yeast since it seems to make a smoother wine than the Red Star.


Now, it is time to begin fermenting.

There are two types of fermenting styles. One style is closed and the other is open. Personally, I prefer and open style of fermenting. This is quite contrary to what most books and other wine makers will tell you. My rationale for an open system is that since yeast need oxygen to convert the sugar, then more oxygen will help the yeast.

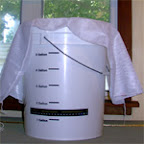
This is the system that I use for my primary fermentation.

This system is primarily a bucket with a large grain/fruit bag tied to the top. If you plan on using this system, keep it up and away from children and pets. Primary fermentation will take about 5 - 7 days. During this time, the solids will float to the top due to the activity of the yeast. This should be "punched down" or gently stirred back into the fermenting wine at least once a day and if you are able to do it, twice a day.

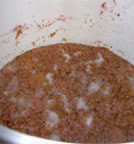
This is what the solids look like.

When it is time to transfer to your secondary, the one thing that I do is to skim the solids off prior to racking over. Most times I use a slotted spoon to allow any liquid to flow through. These solids are pretty thick, so they tend not to fall back into the wine when you are scooping it out.

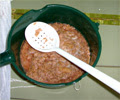
Scooping out the solids.

To rack over to my secondary, I use a funnel. Other people will tell you to use a siphon system. Personally, using the funnel is easier and quicker so that is what I use.

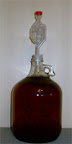
Secondary fermenter ready for the wine.

Notice the handle?
Best investment when using glass carboys.

Pour the wine into your secondary, put an airlock on it and let it be. Generally, I'll let my wine sit for a month or two before racking it over again. It really depends on how many solids have settled at the bottom. If a lot have settled then I rack it over in about a week or two. Otherwise, let it clear up a bit before racking again.

After about the third racking, I rack the wine into a one gallon jug and put an airlock on it for about two weeks. Then I cap it. The one gallon jugs are easier to handle when it comes time to bottle, because I use a funnel to bottle .

One gallon jug with airlock

At bottling time, clean and sanitize your bottles along with your corks or screw caps. Use a funnel and pour your wine from the one gallon jug into your bottle. Cap it and let it age for a few months. I have gone to using screw capped bottles because they are easier to open. Also, with the screw cap bottles, you can open it and sample it before given it to someone. It saves on being embarrassed about given your friends some really nasty wine.

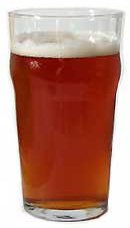
Well, that's it in a nutshell. Time, to kick back and enjoy some wine.

Read more...

3 Basic Ways to Make Beer

Thursday, February 21, 2008

So, your tired of the mass produced swill that you have been drinking. Your ready to make a change and you want to make your "perfect" glass of suds. Well, grab a beer, sit back and for the next few Thursdays, learn how to brew your own beer.

Now, in the old days, making your own beer was a long process and still is for the all-grain brewer. But, thanks to modern technology, you don't have to spend hours making beer. There are 3 basic methods in making beer. You can be an extract brewer and this will also include those who use a kit, a partial masher, or an all grain brewer. If you are a beginner, then you might want to make quite a few extract batches before move up. I will cut down on your frustration factor big time.

The outline for this series is pretty simple. I'll go over the steps of the 3 basic brewing methods, talk about some equipment, and give some helpful hints in brewing. Today we will cover the steps in making an extract beer.

Extract Brewing Steps

1. Fill your brewpot about 2/3 full of clean water and set on the stove. I usually use bottled water since it doesn't have chlorine.

2. Turn burner to medium-high

3. Some people at this stage warm up their extract while waiting for the water in the brewpot to boil. I don't.

4. As the water begins to boil in the brewpot, open your extract and slowly stir it in with a long handled spoon. Don't dump it in and hurry up and stir it. It might clump if you do it that way and scorch on the bottom. I've done it and it is a real pain to clean up.

5. At this point, I take some of the warm wort out and put in the empty extract can. Swirl it around to get as much extract as you can and pour it in the wort. I usually do this several times to each can. Makes for easier cleaning later on.

6. Top off the brewpot to about 2 - 3 inches from the top. Bring the wort to a boil (you might need to turn up the burner) DO NOT, put a lid on the brewpot because it will boil over a create one heck of a mess.

7. Boil the wort for the time of the recipe. During this stage you will be adding hops and for the last 15 - 20 minutes adding Irish moss. The Irish moss helps to clarify the beer by pulling the solid material out.

8. After boiling, you must chill the wort. There are several different ways. I pour cold water into my primary fermenter and then pour the wort into it. Other people fill the sink with cold water or ice and chill down the brewpot.

9. After the wort has chilled below 100 degrees, take a hydrometer reading. Use the chart that comes with the hydrometer to figure out how much more you need to add to your reading. For a reading around 100 degrees, add .007 to your reading.

10. Add the yeast. I usually add my yeast around "blood temperature" (98 degrees), while others will only pitch around 70 degrees.

11. I open ferment for the first 12 hours. I tie a clean grain bag around the top of the fermenter and allow it to "breath". After 12 hours, I put the lid on along with the airlock and allow it to continue fermenting for about a week. If you are not into the open fermentation (most people will tell you that it will become contaminated and bad), then put the lid on and allow the beer to ferment.

12. Keep your fermenter in a cool place during the week and keep it out of direct sunlight.

13. After a week, take another hydrometer reading and either transfer to a secondary fermenter or begin bottling. Your hydrometer reading should be 65 - 75% below your original reading before fermentation. ie. Original reading 1.050 After a week it should be between 1.012 to 1.017.


Partial Mashing Steps

1. Add 1 1/2 quarts of water per pound of grain to your brew pot. So for example, you are using 5 pounds of grain then you will need 7.5 quarts of water or almost 2 gallons. Your water should have a ph reading between 5.0 to 5.5 to achieve optimal results.

2. Heat water to between 160 to 168 degrees F.

3. Add crushed malt to water and mix well. Ideally when you crush the malt it shouldn't look like cornmeal. The husk on the grain should be split but not completely off. Personally, I tend to crush my speciality grains to a cornmeal consistency. It seems to me that I get a thicker more flavorful wort that way. I have also done it for an all-grain batch, but it tends to be messier and more of a hassle when draining and sparging.

4. Stir the wort and check the temperature. You want get the temperature to 158 degrees F. Once that is done, cover the brew pot and maintain that temperature for 60 minutes.

5. In a separate pot, heat 2 quarts of water per pound of grain to between 160 to 170 degrees F.

6. After the starch conversion (original pot with grains) has simmered for 60 minutes, raise the temperature to between 160 to 170 degrees F and hold for 15 minutes.

7. Pour the mash into a strainer that is suspended over your brewing bucket. I bought a large stainless steel colander to use in cottage cheese and it fits perfect over the brewing bucket. Allow to drain for a few minutes.

8. Next take the strainer full of grain and put it over your brew pot and pour the cloudy wort from your brewing bucket over the grains in the strainer.

9. Pour the sparge water over the grains and allow to drain for 5 to 10 minutes.

10. Remove the strainer, add your extract and begin your beer.


The picture above is a good example of what a "true" all grain brewer would be getting into. A lot more equipment and time, but a better control over your beer. On the other hand, if you want to try brewing an all-grain beer without too much of an investment, visit J. Kelly's Homepage. Nice little set-up for very little cost. Personally, I use the partial mashing technique because it saves time and I also don't want to take up a lot of space with my hobby. Keeps the wife happy. Here are the steps in making an all-grain beer:

All Grain Brewing

1. Heat 1 1/3 quarts of water for every pound of grain. The temperature should be around 160 - 170 degrees F.

2. Mix in the crushed grains and stir well.

3. Temperature at this point should be 150 - 158 degrees F and water pH should be 5 - 5.5

4. Hold this temperature for about 60 - 90 minutes to get a full starch conversion.

5. In another kettle, heat up 2 quarts of water per pound of grain

6. After the starch conversion, raise the temperature to 160 - 170 degrees F. Keep at this
temperature for 10 to 15 minutes.

7. Ladle the mash into a lauter tun. A lauter tun is basically another kettle that has a false bottom that allows the wort through and keeps the grains behind. Think big strainer.

8. As the mash is draining in the lauter tun, take a sauce pan and draw off about 2 quarts of wort and add it back into the lauter tun. This is call recirculation and what recirculation does is filter out any large particles. This will take about 10 - 15 minutes and by that time you should have a clear liquid. Add this to your brewpot.

9. Next begin to slowly add the sparge water (step 5) and allow it drain down through the grains. This will take between 45 - 60 minutes. So you might as well grab a beer by this time. Add the liquid to your brewpot. At this point you should have 6 to 7 gallons of wort if doing a 5 gallon batch.

10. Boil the wort for about 60 to 90 minutes and add the hops and other ingredients according to your recipe.

11. Chill the wort. Most "All-Grainers" use a wort chiller. Siphon the wort to your primary fermenter and add yeast.

As you can see, there is a lot of time involved. If you are using a hand cranked crusher, doing 10 pounds of grain will take some time. Hopefully, you can get your partner involved in this and make a day of it. Because, in most cases, it will take almost a good 8 hours.

Read more...

Why Is Moonshing Against The Law ?

Tuesday, February 19, 2008


It's one of those cold winter's days and I'm sitting here waiting for a shipment of hops to arrive so that I can make a batch of beer. I was out of hops and had to order them online. (see why at Beer Recipes) So beer making has been put on hold. Instead, I went surfing and found this article and thought that I would share it with you.


You can make your own wine and beer, can't you?
By Michelle Tsai
Posted Thursday, Oct. 18, 2007, at 6:50 PM ET

Two Georgia men pleaded guilty on Wednesday to charges of operating a moonshine still in the Chattahoochee National Forest. One of the bootleggers faces up to 35 years in prison for his crimes: making the brew, selling it, and not paying taxes on the proceeds. Back in college, the Explainer had friends who brewed their own beer, and that wasn't against the law. So why is moonshine still illegal?

Because the liquor is worth more to the government than beer or wine. Uncle Sam takes an excise tax of $2.14 for each 750-milliliter bottle of 80-proof spirits, compared with 21 cents for a bottle of wine (of 14 percent alcohol or less) and 5 cents for a can of beer. No one knows exactly how much money changes hands in the moonshine trade, but it's certainly enough for the missing taxes to make a difference: In 2000, an ATF investigation busted one Virginia store that sold enough raw materials to moonshiners to make 1.4 million gallons of liquor, worth an estimated $19.6 million in lost government revenue. In 2005, almost $5 billion of federal excise taxes on alcohol came from legally produced spirits.


You can read the entire article at Slate.com


Read more...

Pilsner Urquell

Thursday, February 14, 2008

Read more...

English Bitter

Tuesday, February 12, 2008


Beer Style Series


The Bitter style came from brewers who wanted to differentiate these ales from other mild brews, enter pale malts and more hops. Most are gold to copper in color and are light bodied. Low carbonation. Alcohol should be low and not perceived. Hop bitterness is moderate to assertive. Most have a fruitiness in the aroma and flavor, diacetyl can also be present. These are traditionally served cask conditioned, but many breweries have bottled versions.

There are three classic styles of English Bitters. They are the Ordinary (mild), the Special (moderate strength), and the Extra Special (a stong bitter). They are typically characterized with traditional hops such as Kent Goldings, Fuggles, or Brewers Gold. Just as they range from mild to strong, the color and alcohol percentage also follow.


Style statistics:

OG (Original Gravity): 1.039–1.042
FG (Finished Gravity): 1.006–1.012
IBU’s (International Bittering Units): 28–46
SRM (Standard Reference Method): 12-14
Alcohol (% by volume): 4.2–4.8


Read more...

Future of Homebrewing

Thursday, February 07, 2008

These are the last few paragraphs from an article from Brew Your Own magazine that touches on the the upcoming hop crisis. Really makes you think about the short term future of homebrewing.

Some folks have opined that the decrease in hop varieties will cause some homebrewers to take a break for a few years or quit altogether. Others say that, as the price of commercial beers go up, homebrewing will become a more attractive option for many. Charles Culp of Austin Homebrew Supply doesn’t see the hop shortage fundamentally changing our hobby. “Homebrewing is a lifestyle,” he says, “We do it because we like brewing. People aren’t going to throw this all away just because they can’t find any
Styrian Goldings.”

We’re all going to spend some time crying in our beers over the temporary absence of our favorite hop varieties. However, this shortage will likely spur a lot of innovation in brewing and — just as with the birth of the craft brewing industry — homebrewers will be a vital force in the process.

After a gloomy week of researching this story, I turned on CNN and saw that water may need to be rationed in some areas of the South next year. Looking for some good news, I called Greg Doss of Wyeast and asked if yeast would be available. He laughed. “Yeah,” he said, “we’ll make all the yeast you guys need.”

Read the entire article.

Read more...

Wine and Dine Your Sweetheart

Tuesday, February 05, 2008

With Valentine's Day just around the corner, I thought that I would give you another idea for you to celebrate that day. ** Note -- Feed readers may have to visit the site to view the article.


Related Post: Top 10 Wine and Chocolate Matches

Technorati Tags: , , ,

Read more...

  © Blogger templates Newspaper II by Ourblogtemplates.com 2008

Back to TOP